
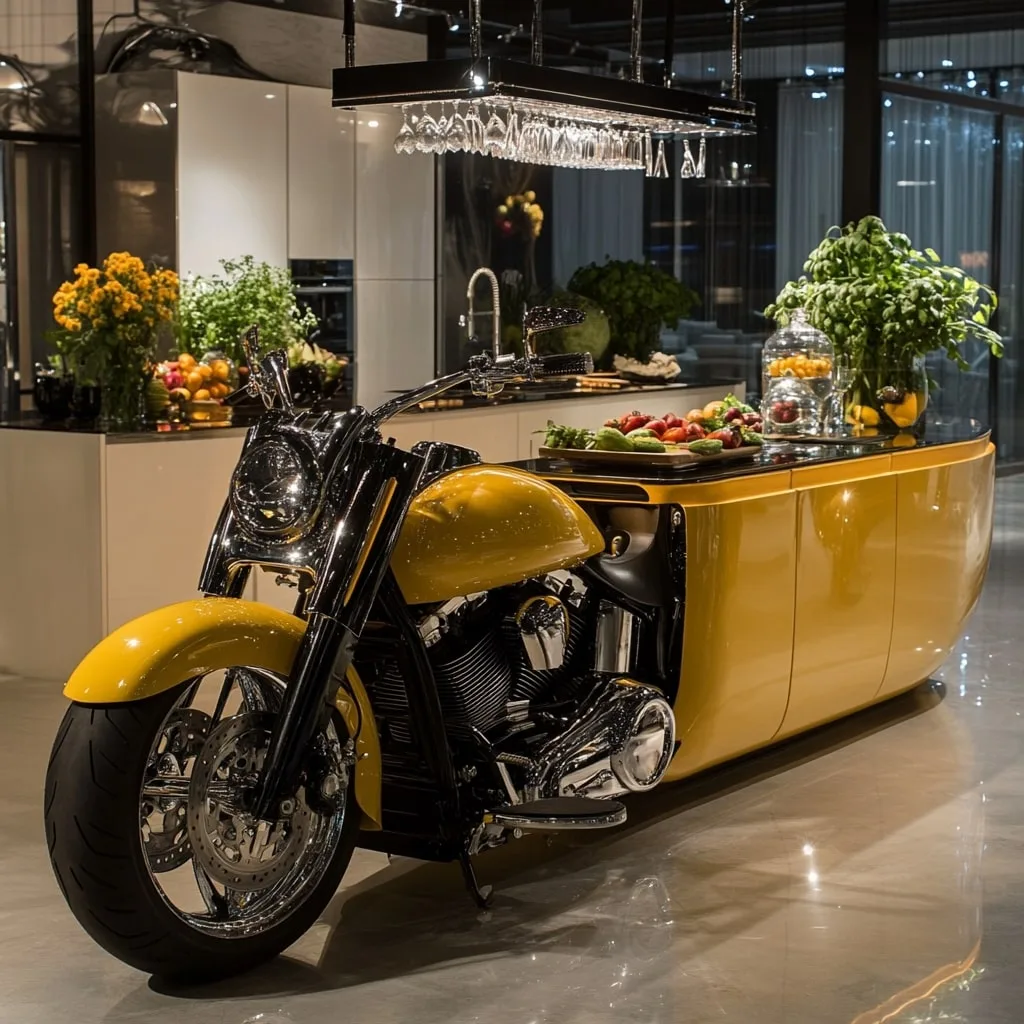
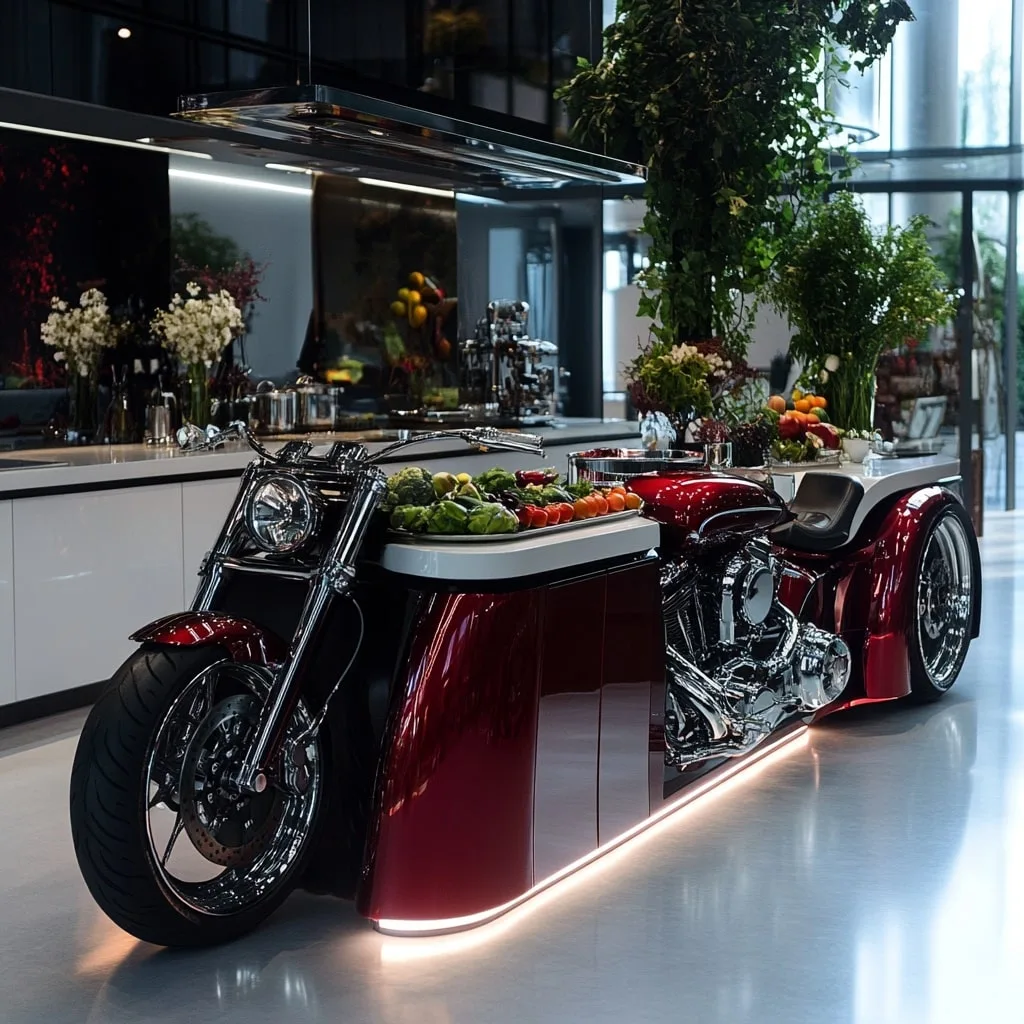
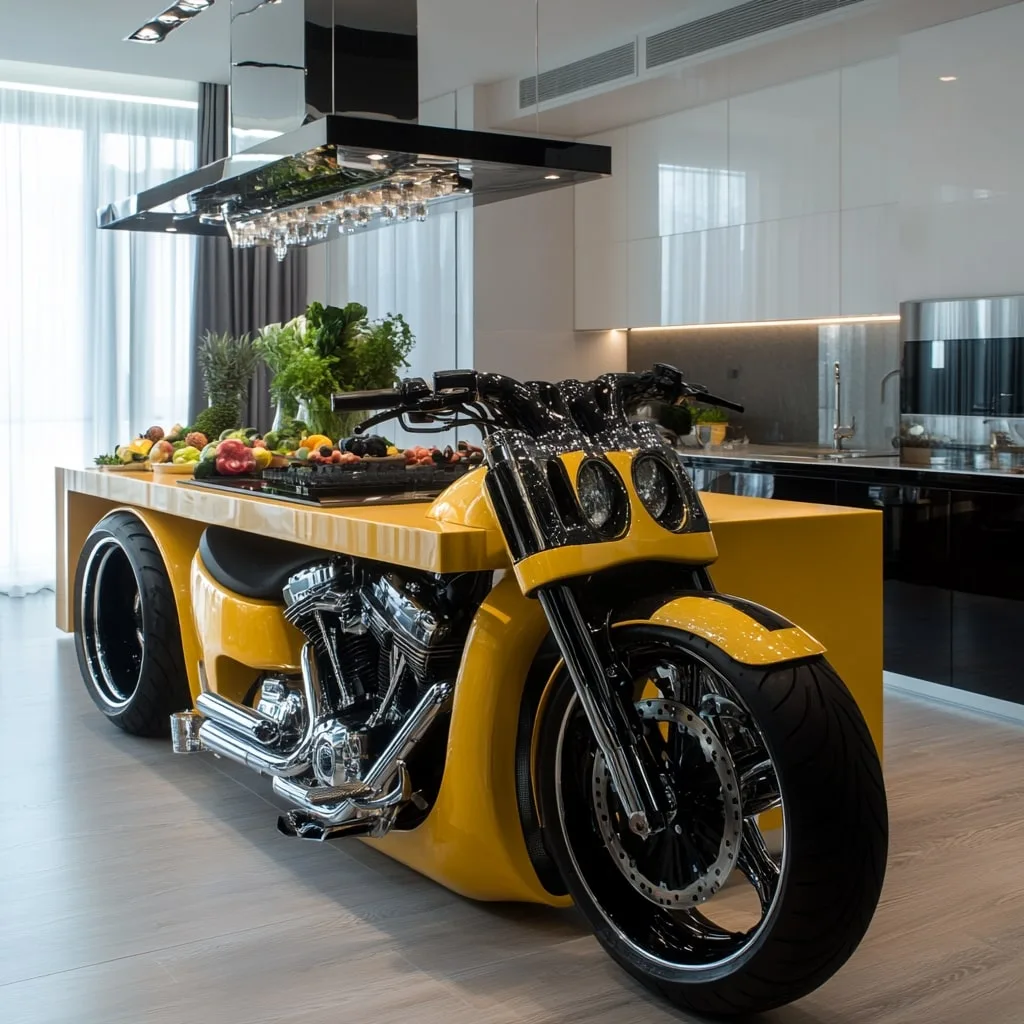
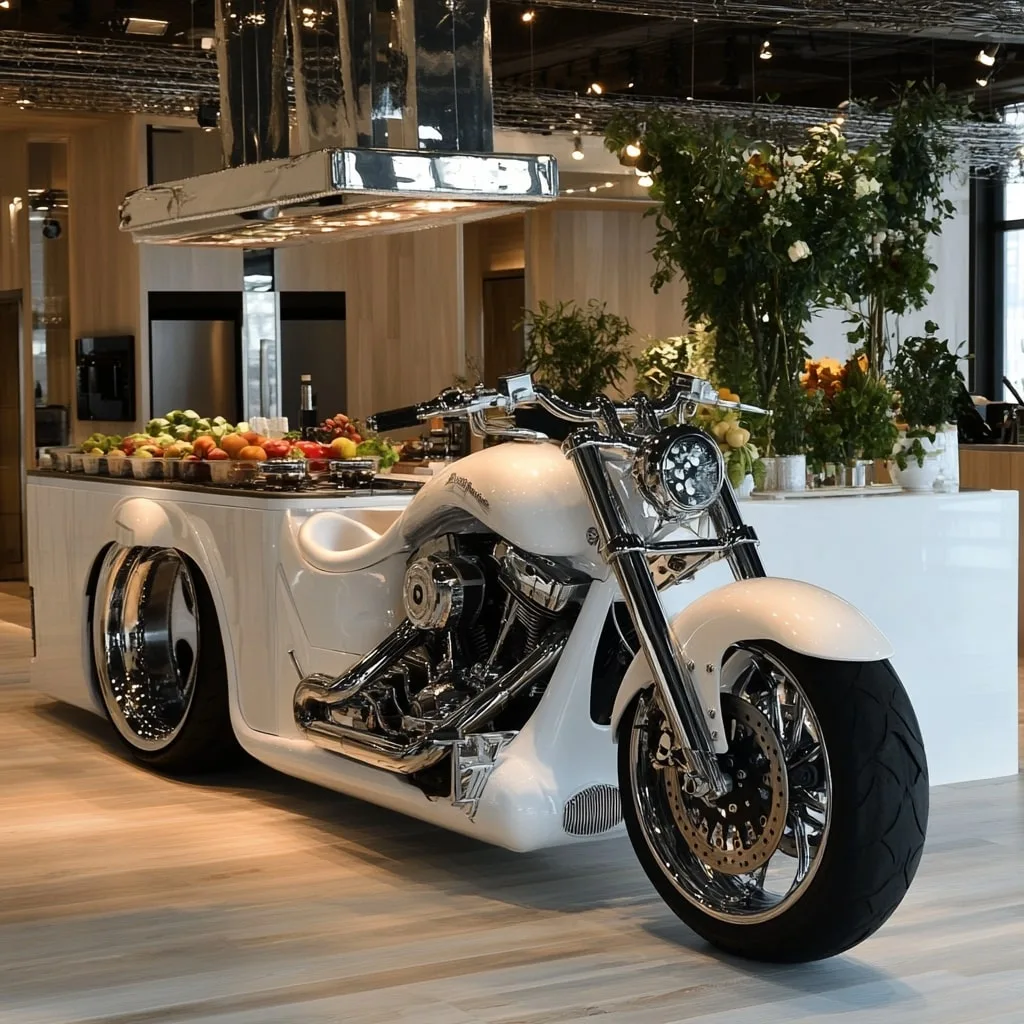
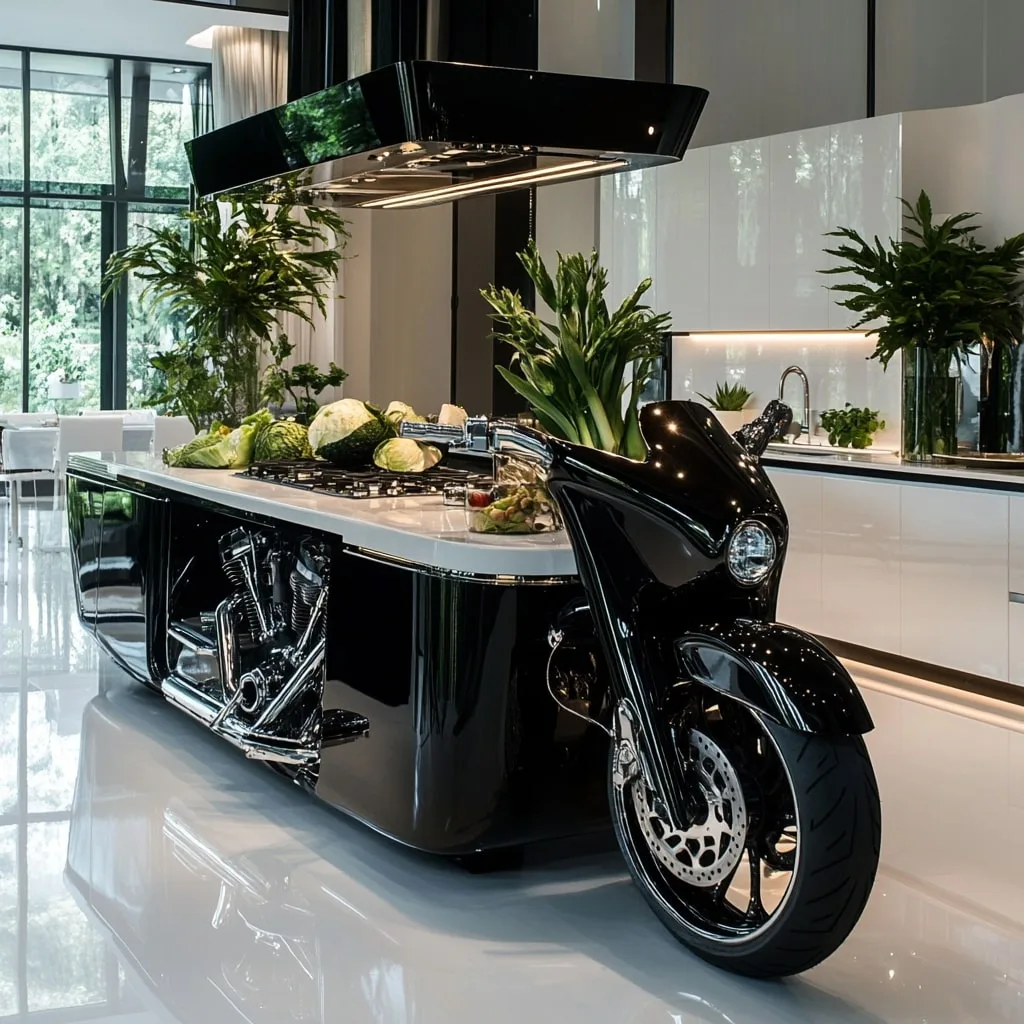
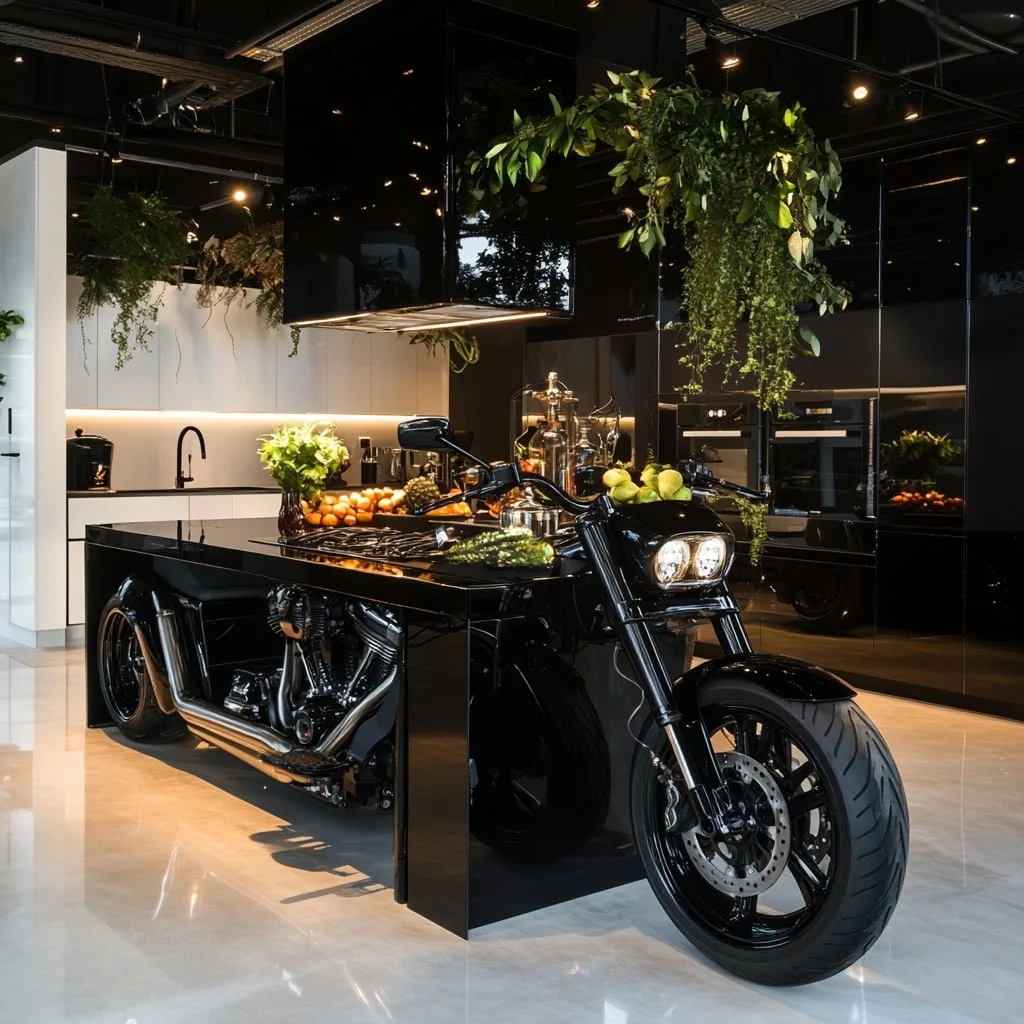
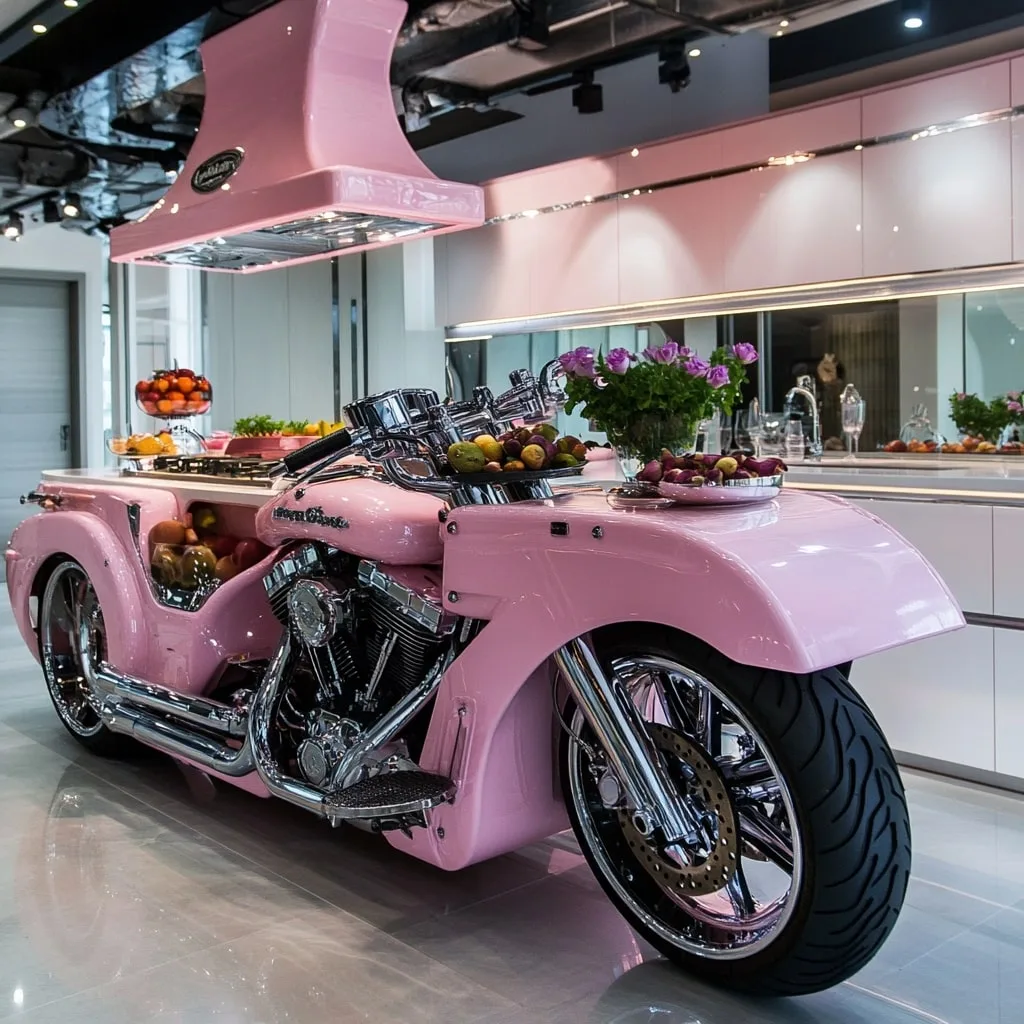
The Harley Davidson kitchen island is more than just a functional piece of furniture; it’s a bold statement for motorcycle enthusiasts who want to infuse their love for the iconic brand into their home. Harley Davidson, a name synonymous with freedom, rebellion, and timeless style, inspires designs that bring rugged charm to modern spaces. A kitchen island themed around this legendary brand can transform your kitchen into a unique, personalized hub that reflects your passion.
In this guide, we’ll explore how to create a Harley Davidson kitchen island that balances aesthetics, practicality, and the unmistakable vibe of the open road. Whether you’re a DIY enthusiast or looking to hire a professional, this 2000 word blog post will provide actionable tips, design ideas, and inspiration to craft the perfect kitchen island. Let’s dive into the world of Harley Davidson inspired kitchen design!
Why Choose a Harley Davidson Kitchen Island?
A kitchen island is often the heart of the home, where meals are prepared, conversations unfold, and memories are made. Adding a Harley Davidson theme elevates this centerpiece, making it a conversation starter and a reflection of your personality. Here’s why a Harley Davidson kitchen island is a fantastic choice:
A Unique Blend of Style and Passion
Harley Davidson is more than a brand; it’s a lifestyle. Incorporating its iconic elements like chrome accents, bold logos, or leather textures into a kitchen island creates a space that’s distinctly yours. It’s a way to celebrate your love for motorcycles while maintaining a functional kitchen.
Versatility in Design
From sleek and modern to rustic and industrial, a Harley Davidson kitchen island can adapt to various design aesthetics. Whether you prefer a minimalist look with subtle Harley touches or a full on biker vibe, the possibilities are endless.
Increased Home Value
Custom kitchen islands, especially those with a unique theme, can add value to your home. A well designed Harley Davidson kitchen island can appeal to fellow enthusiasts or buyers looking for a standout feature.
Planning Your Harley Davidson Kitchen Island
Before you start building or designing, careful planning is essential to ensure your Harley Davidson kitchen island meets your needs and complements your space. Here’s how to get started:
Assess Your Kitchen Space
Measure your kitchen to determine the size and shape of your island. A Harley Davidson kitchen island should be proportionate to the room, leaving enough space for movement. Aim for at least 36 to 48 inches of clearance around the island for comfort.
Consider the island’s purpose: Will it serve as a prep station, dining area, or storage hub? This will influence its design and features. For example, a larger island might include a built in sink, while a smaller one could focus on seating.
Set a Budget
Custom kitchen islands can range from a few hundred dollars for a DIY project to thousands for a professionally crafted piece. Factor in materials, finishes, and Harley Davidson branded accessories when setting your budget. Decide whether you’ll splurge on authentic Harley parts or opt for inspired elements to keep costs down.
Choose a Design Theme
Your Harley Davidson kitchen island can lean into different vibes:
- Classic Harley: Think black leather, chrome details, and the iconic orange and black logo.
- Vintage Biker: Incorporate distressed wood, retro Harley decals, and rustic hardware.
- Modern Motorcycle: Sleek lines, stainless steel, and subtle Harley branding for a contemporary look.
Pick a theme that aligns with your kitchen’s existing decor to ensure a cohesive design.
Materials and Finishes for a Harley Davidson Kitchen Island
The materials you choose will define the look and durability of your Harley Davidson kitchen island. Here are some ideas to capture the brand’s rugged yet stylish essence:
Countertops
- Granite or Quartz: Black or dark gray countertops mimic the sleek finish of a Harley motorcycle. Look for options with subtle metallic flecks to evoke chrome.
- Butcher Block: A warm wood countertop adds a rustic touch, perfect for a vintage Harley theme.
- Stainless Steel: For a modern, industrial vibe, stainless steel is durable and reflects Harley’s chrome aesthetic.
Cabinetry and Base
- Wood: Oak or walnut in a dark stain complements Harley’s classic look. Distress the wood for a weathered, road worn effect.
- Metal: Incorporate metal panels or accents to mimic a motorcycle’s frame. Brushed aluminum or powder coated steel works well.
- Leather Accents: Use leather or faux leather for drawer pulls or panel inserts to add texture and authenticity.
Harley Davidson Branding
Incorporate authentic Harley Davidson elements sparingly to avoid overwhelming the design:
- Logos: Add a laser etched Harley Davidson logo on the countertop or a decal on the side of the island.
- Hardware: Use chrome or matte black knobs and pulls inspired by motorcycle parts.
- Repurposed Parts: For a bold statement, integrate actual Harley parts like handlebars as towel racks or a wheel as a decorative base.
Design Features to Enhance Your Harley Davidson Kitchen Island
A well designed Harley Davidson kitchen island combines form and function. Here are some features to consider:
Storage Solutions
Maximize space with:
- Drawers and Cabinets: Store kitchen essentials in deep drawers or cabinets with Harley inspired hardware.
- Open Shelves: Display Harley Davidson memorabilia, like model bikes or branded glassware, on open shelves.
- Wine Rack: A built in wine rack with a chrome or leather accent adds sophistication.
Seating Area
Include bar stools to make your island a social hub. Choose stools with:
- Leather Upholstery: Black or brown leather seats with Harley Davidson embroidery.
- Chrome Frames: Sleek metal frames that echo motorcycle aesthetics.
- Custom Cushions: Cushions featuring Harley logos or flame patterns for a playful touch.
Lighting
Lighting sets the mood for your Harley Davidson kitchen island. Consider:
- Pendant Lights: Chrome or matte black pendant lights with an industrial or retro design.
- LED Strips: Install LED strips under the countertop for a modern glow that highlights the island’s details.
- Harley Inspired Fixtures: Look for lighting fixtures shaped like headlights or featuring Harley motifs.
Functional Add Ons
Make your island a workhorse with:
- Built In Sink: A small prep sink for convenience, with a chrome faucet to match the theme.
- Power Outlets: Hidden outlets for charging devices or powering appliances.
- Cutting Board Insert: A removable butcher block section for food prep.
DIY vs Professional Build for Your Harley Davidson Kitchen Island
Deciding whether to build your Harley Davidson kitchen island yourself or hire a professional depends on your skills, budget, and vision.
DIY Harley Davidson Kitchen Island
A DIY project is ideal for those with woodworking or crafting experience. Here’s a basic guide:
- Design: Sketch your island, including dimensions and features. Use free online tools like SketchUp for precision.
- Materials: Source wood, metal, or countertops from local suppliers. Check salvage yards for Harley parts.
- Construction: Build the frame with wood or metal, then add the countertop and finishes. Sand and stain for a polished look.
- Branding: Apply Harley Davidson decals or etch the logo using a laser cutter.
- Safety: Ensure the island is sturdy and level to prevent accidents.
Pros: Cost effective, fully customizable, and satisfying.
Cons: Time consuming and requires skill.
Professional Build
Hiring a carpenter or kitchen designer ensures a high quality result. Look for professionals experienced in custom furniture or themed designs. Provide them with:
- Detailed sketches or inspiration photos.
- Your budget and timeline.
- Specific Harley Davidson elements you want included.
Pros: Professional finish, saves time, and access to premium materials.
Cons: More expensive and less personal involvement.
Incorporating Harley Davidson Memorabilia
A Harley Davidson kitchen island is the perfect place to showcase your collection of memorabilia. Here are some ideas:
- Model Motorcycles: Display miniature Harley bikes on open shelves or in a glass case built into the island.
- Vintage Signs: Mount a retro Harley Davidson sign on the side of the island or above it.
- License Plates: Use old Harley themed license plates as drawer fronts or wall decor near the island.
- Leather Jackets: Hang a Harley Davidson leather jacket on a hook attached to the island for a casual, authentic touch.
Be selective to avoid clutter. Choose one or two standout pieces to keep the design clean and impactful.
Maintaining Your Harley Davidson Kitchen Island
To keep your Harley Davidson kitchen island looking pristine, follow these maintenance tips:
- Clean Regularly: Wipe down countertops with a mild cleaner to remove stains and grease. Avoid harsh chemicals on wood or leather.
- Polish Chrome: Use a chrome polish to maintain the shine of metal accents or hardware.
- Protect Wood: Apply a food safe sealant to wood surfaces every few months to prevent damage.
- Inspect Parts: Check repurposed Harley parts for wear and tear, especially if they’re functional, like handlebars.
Regular upkeep ensures your island remains a stunning centerpiece for years.

Ride Your Style into the Kitchen
A Harley Davidson kitchen island is more than a piece of furniture; it’s a celebration of a lifestyle that values freedom, individuality, and bold design. By carefully planning your island, choosing the right materials, and incorporating authentic Harley Davidson elements, you can create a kitchen centerpiece that’s both functional and unforgettable. Whether you go the DIY route or hire a professional, the result will be a space that reflects your passion for the open road.
Start small with a few Harley inspired touches or go all out with a fully customized island—either way, your kitchen will become a hub of style and personality. So, rev up your creativity, channel the spirit of Harley Davidson, and build a kitchen island that’s ready to steal the show. What’s your vision for a Harley Davidson kitchen island? Share your ideas in the comments below, and let’s keep the inspiration rolling!