
Staircases have evolved from mere functional structures into stunning architectural features that can completely transform the ambiance of your home. Among the most captivating trends in modern interior design is the illuminated epoxy staircase, a breathtaking combination of artistry, technology, and craftsmanship that turns an ordinary pathway into an extraordinary visual experience.
Whether you’re renovating your existing home or planning a new build, incorporating illuminated epoxy stairs can create a focal point that leaves guests mesmerized while adding substantial value to your property. This comprehensive guide will walk you through everything you need to know about creating your own glowing masterpiece.
Understanding the Magic Behind Illuminated Epoxy Stairs
The concept behind illuminated epoxy stairs merges two powerful design elements: the crystal-clear depth of epoxy resin and the ambient glow of LED lighting. When these components work together, they create an ethereal effect that makes your staircase appear to float or glow from within.
Epoxy resin is a thermosetting polymer that, when properly mixed and cured, creates an incredibly durable, glass-like surface. The transparency of high-quality epoxy allows light to travel through it, creating depth and dimension that traditional stair materials simply cannot achieve. When you embed LED strips or fiber optic cables within or beneath the epoxy layers, the light disperses through the resin, creating a soft, even glow that can range from subtle elegance to bold statement lighting.
The beauty of this design approach lies in its versatility. You can create anything from a gentle moonlit pathway to a vibrant color-changing spectacle that responds to music or your mood. The illuminated epoxy staircase indoor installations have become particularly popular because they provide both functional lighting for safety and dramatic aesthetic appeal.
Essential Components of Illuminated Epoxy Stair Parts
Creating a successful illuminated staircase requires understanding the various illuminated epoxy stair parts that work together to achieve the final result. Each component plays a crucial role in both the structural integrity and visual impact of your project.
Structural Foundation
The foundation of your project begins with the stair structure itself. Whether you’re working with wood, metal, or concrete stairs, the underlying structure must be solid, level, and properly prepared. Any imperfections in the base will show through the transparent epoxy, so meticulous preparation is essential.
LED Lighting Systems
The lighting component typically consists of LED strip lights, which offer energy efficiency, longevity, and flexibility in color options. Modern LED systems can be controlled via smartphone apps, allowing you to adjust brightness, color, and even create dynamic lighting patterns. Some advanced systems integrate with smart home ecosystems, enabling voice control and automated scheduling.
Epoxy Resin Components
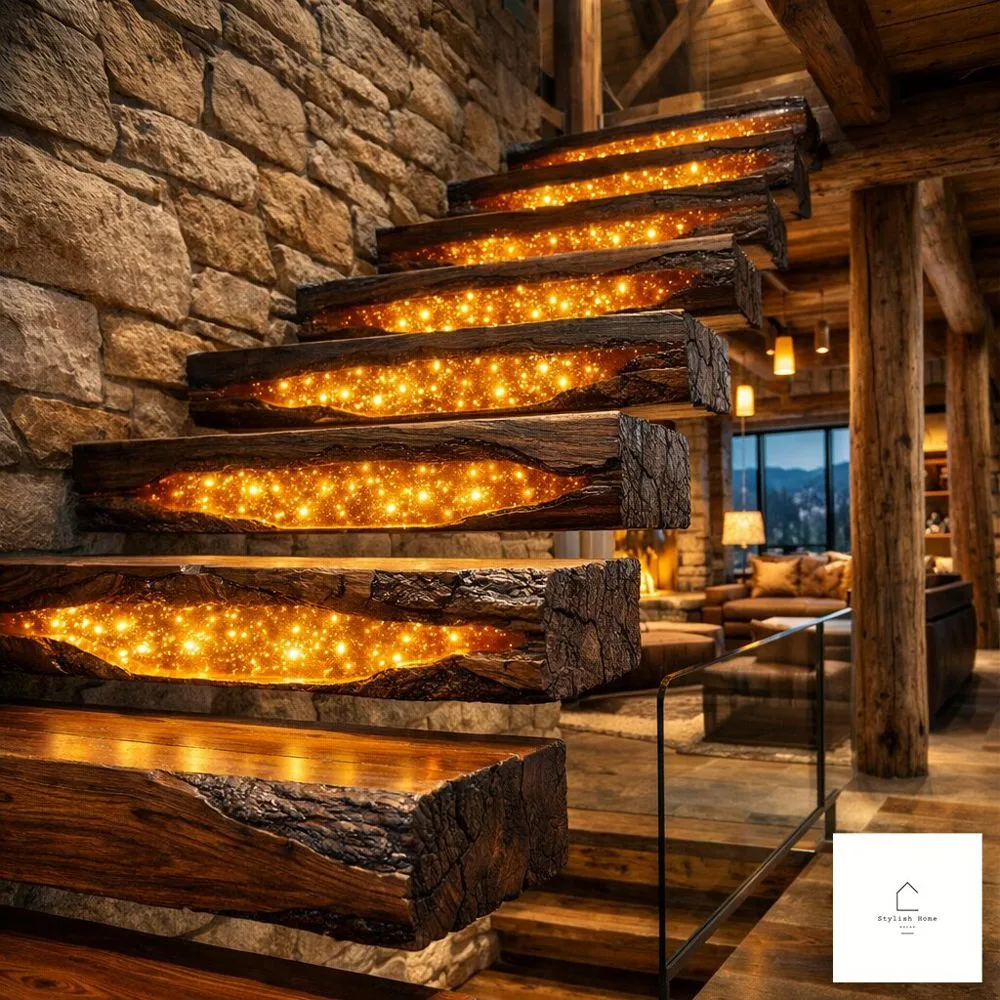
Quality epoxy systems consist of two parts: the resin and the hardener. When mixed in precise ratios, they undergo a chemical reaction that transforms the liquid into a solid, crystal-clear surface. For illuminated applications, you’ll want to use specifically formulated clear casting epoxy that minimizes yellowing over time and maximizes light transmission.
Additional Materials
Depending on your design vision, you might incorporate additional elements such as colored pigments, metallic powders, glow-in-the-dark additives, natural materials like wood pieces or stones, or decorative objects that become encased within the epoxy.
Creative Illuminated Epoxy Staircase Ideas to Inspire Your Project
The possibilities for designing your illuminated epoxy staircase are virtually limitless. Here are some popular and innovative illuminated epoxy staircase ideas that can spark your creativity.
Ocean Wave Theme
One of the most sought-after designs mimics the movement and color of ocean waves. By layering different shades of blue epoxy with white swirls and positioning LED lights strategically, you can create the illusion of water flowing down your stairs. Adding crushed glass or holographic glitter enhances the aquatic effect, making each step feel like walking on water.
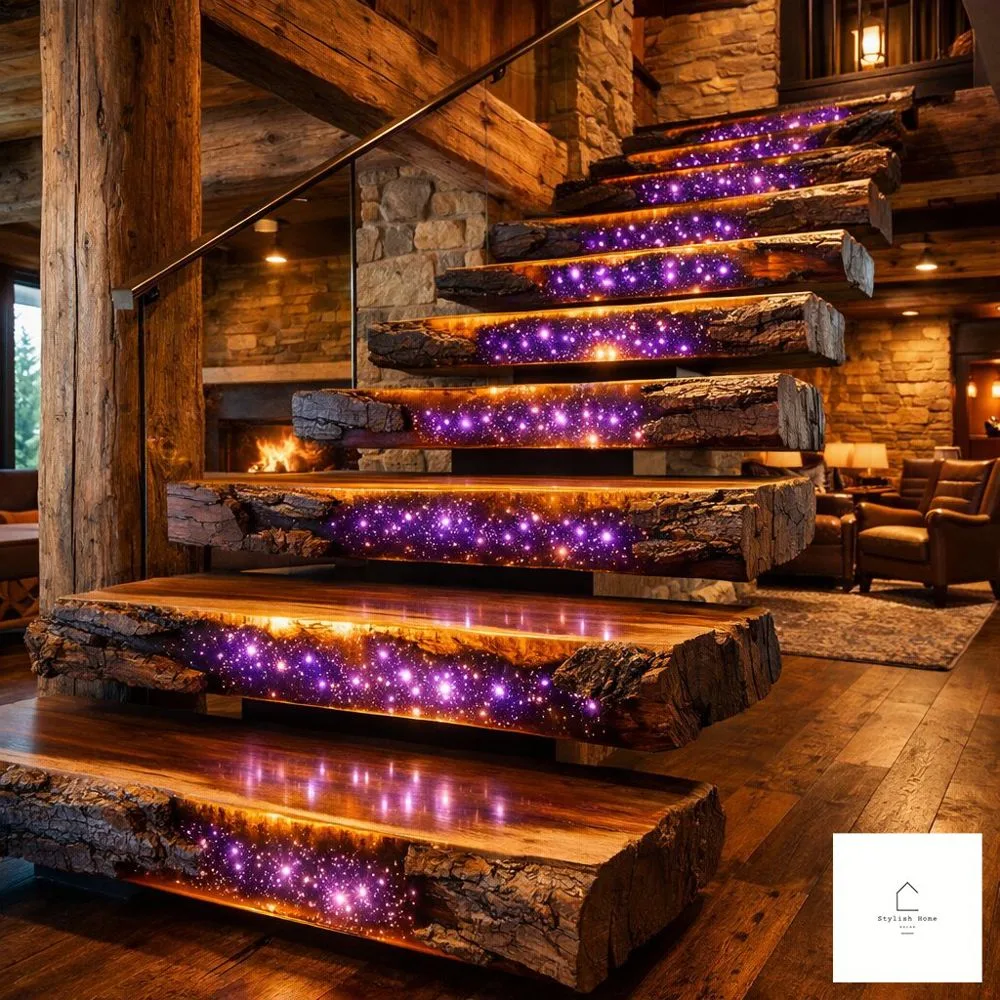
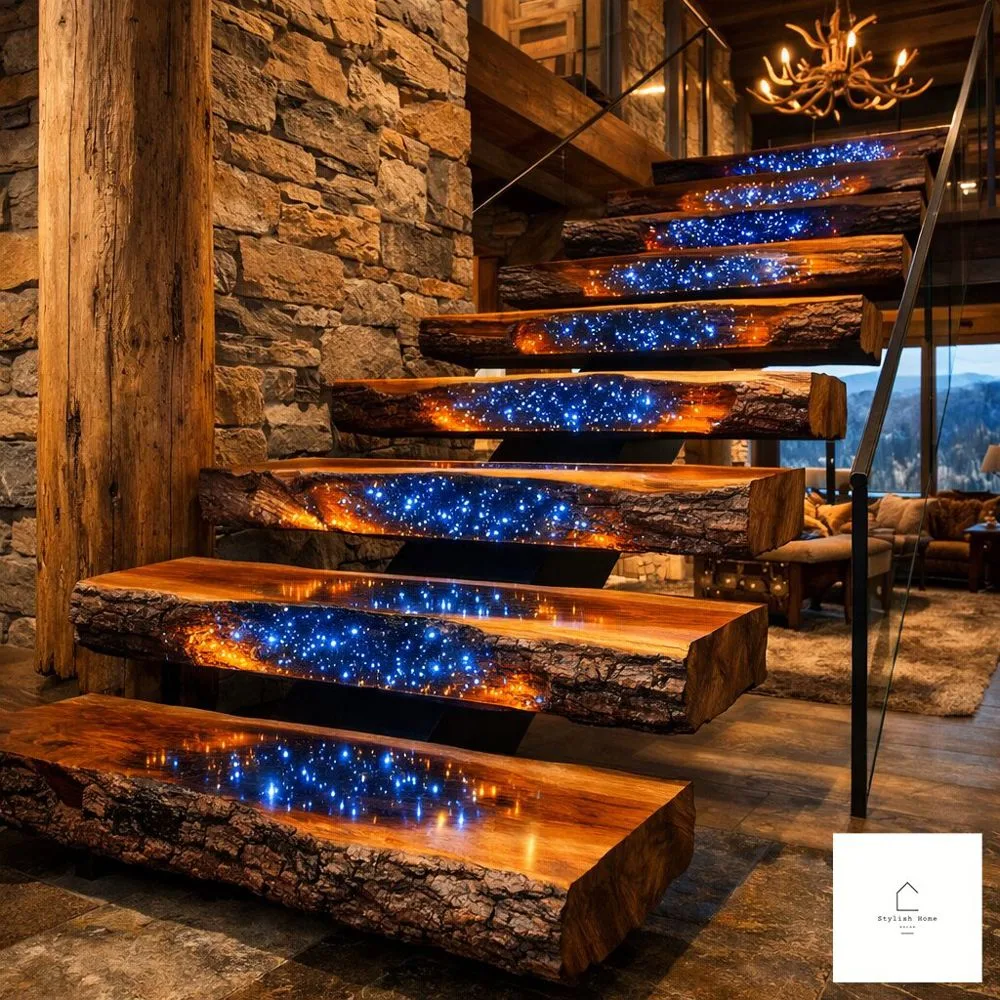
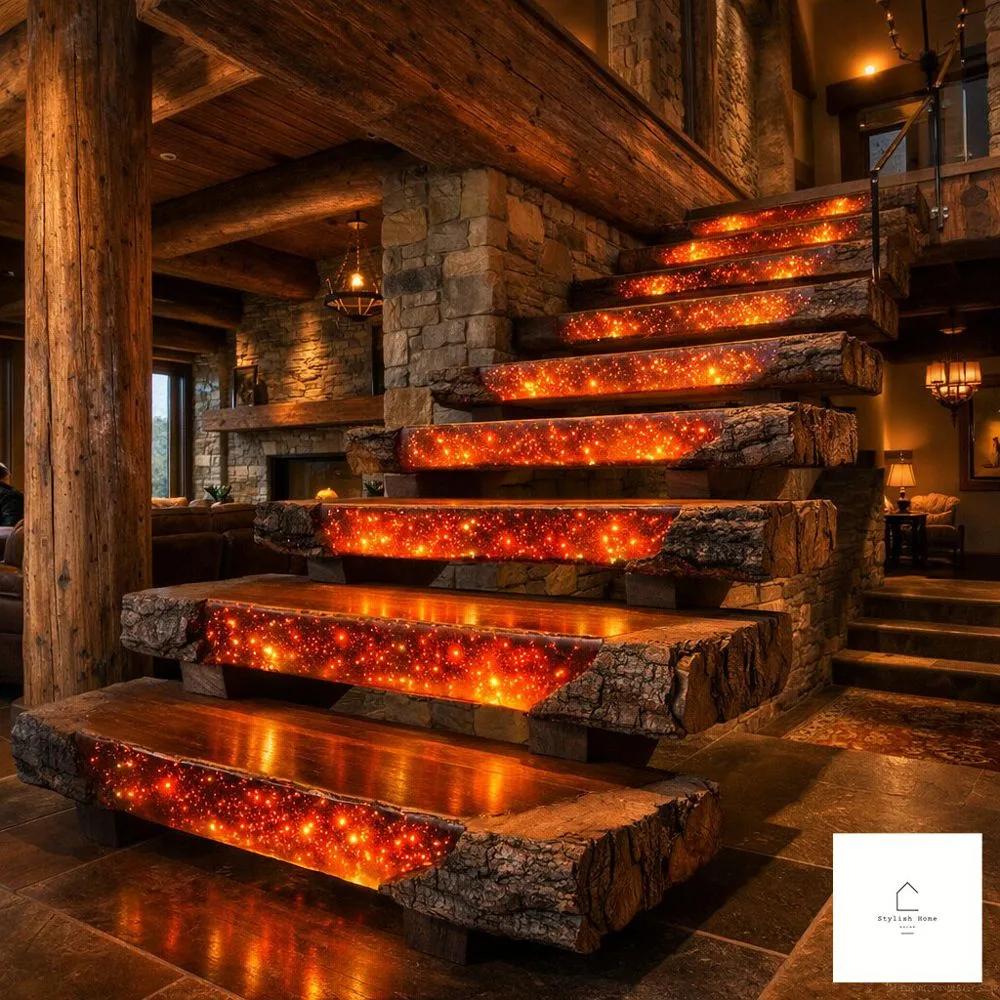
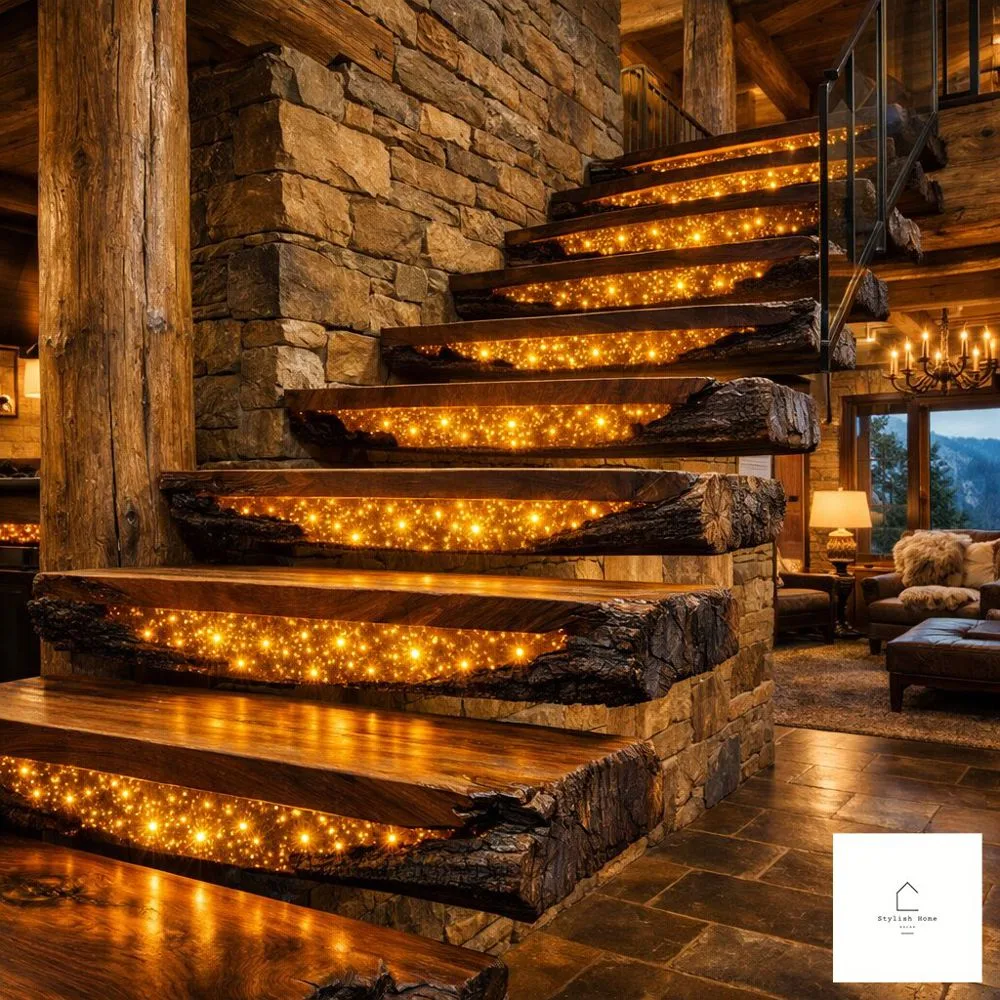
Galaxy and Cosmos Design
Transform your staircase into a journey through space by incorporating deep purples, blues, and blacks with metallic pigments and glitter to represent stars and nebulae. Strategic lighting placement creates depth, making the design appear three-dimensional and truly cosmic.
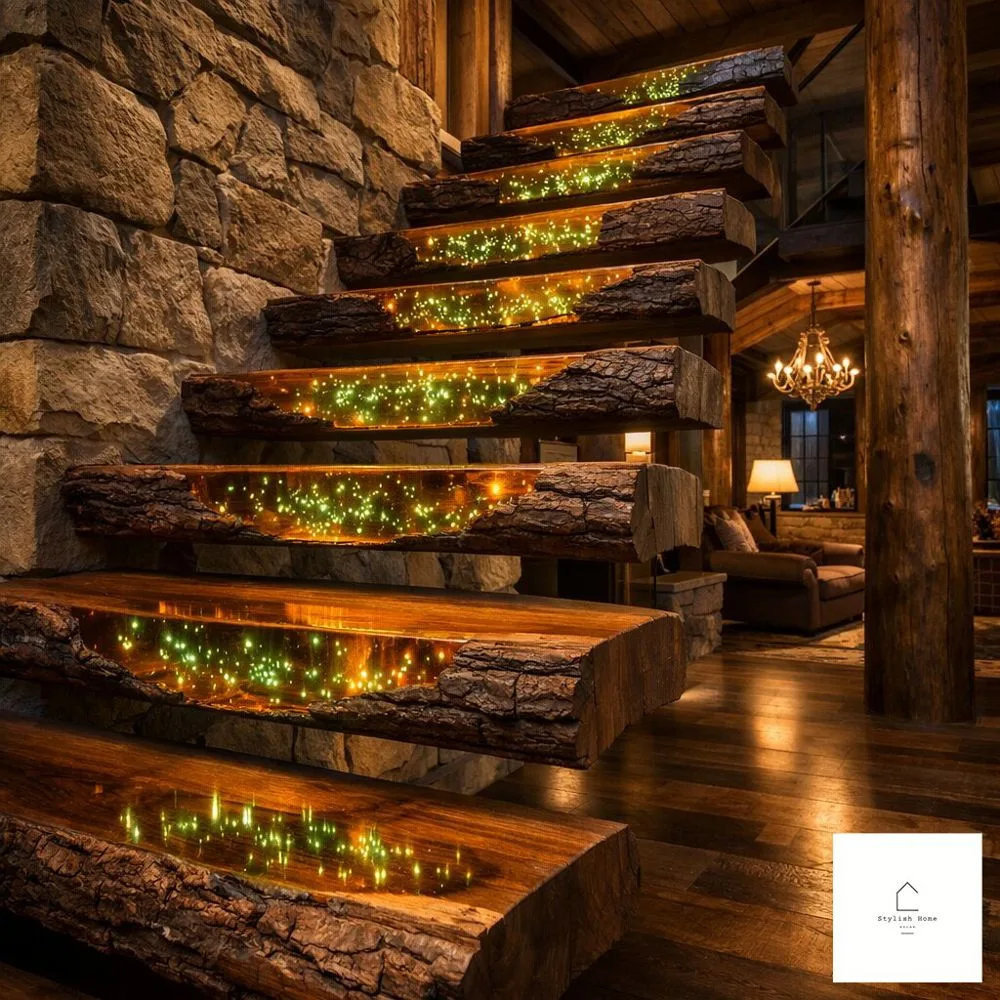
Natural Wood Integration
Combining live edge wood slabs with clear epoxy and subtle lighting creates a rustic yet contemporary aesthetic. The wood grain becomes highlighted by the embedded lights, creating a warm, organic glow that works beautifully in both modern and traditional homes.
Color-Changing Interactive Stairs
For those who love technology, installing color-changing LED systems allows you to transform your staircase’s mood on demand. Program different scenes for entertaining, relaxing, or energizing your space. Some systems can even sync with music, creating a dynamic light show.
Minimalist Frosted Effect
Not every design needs to be bold. A frosted or milky epoxy with soft white LED lighting creates an elegant, contemporary look that provides excellent illumination without overwhelming your decor.
Choosing the Right Illuminated Epoxy Staircase Kit
For those new to epoxy projects, an illuminated epoxy staircase kit can simplify the process significantly. These kits typically include pre-measured epoxy components, LED lighting systems, mixing tools, and detailed instructions.
When selecting a kit, consider the coverage area you need. Measure your staircase dimensions carefully, including the illuminated epoxy staircase treads, risers, and any additional surfaces you want to coat. Most manufacturers provide coverage calculations, but it’s wise to order slightly more than your measurements indicate to account for waste and potential mishaps.
Quality matters enormously in epoxy products. Look for kits that use UV-resistant formulations to prevent yellowing, have a reasonable working time so you’re not rushed during application, provide high clarity for maximum light transmission, and include reliable LED components with good warranties.
Some comprehensive kits also include everything needed for surface preparation, such as primers, sealers, and cleaning solutions. While these complete packages cost more upfront, they eliminate the guesswork and multiple shopping trips.
Installation Considerations for Different Areas
Working with an Illuminated Epoxy Staircase Wall
An illuminated epoxy staircase wall creates a stunning vertical light feature that complements your stairs. This approach involves applying epoxy to the wall surface adjacent to your staircase, embedding LED strips behind or within the epoxy layers.
The process requires careful attention to vertical application techniques, as epoxy naturally wants to flow downward. Using slower-curing formulations and applying thinner coats helps prevent sagging. Some installers create containment frames to hold the epoxy in place during curing.
The visual effect of a glowing wall alongside your stairs creates a cohesive design that makes your entire stairwell feel like a unified art installation. This approach works particularly well in narrow stairwells where traditional lighting might feel cramped.
Designing an Illuminated Epoxy Staircase Floor
Extending your design to include an illuminated epoxy staircase floor at the top or bottom of your stairs creates visual continuity and expands the impact of your project. Floor applications require especially durable epoxy formulations designed to withstand foot traffic, and the floor preparation becomes critical as any substrate imperfections will telegraph through.
Many homeowners create a transition effect where the intensity or color of the illumination gradually changes from the stairs to the floor, guiding movement through the space while creating visual interest.
Color Options with Illuminated Epoxy Staircase Paint
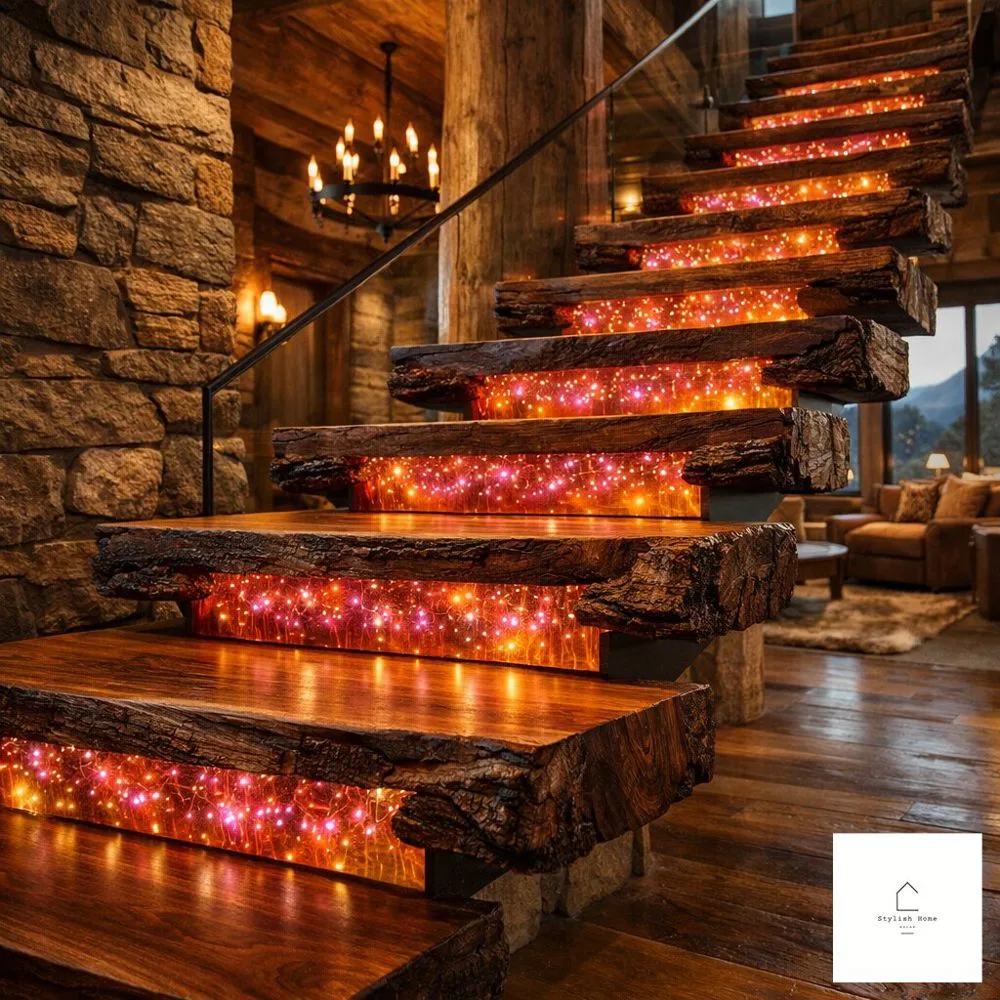
While pure clear epoxy showcases the light in its most pristine form, adding illuminated epoxy staircase paint or pigments opens up countless design possibilities. Epoxy pigments come in various forms, including liquid concentrates, powder pigments, metallic additives, and glow-in-the-dark powders.
Translucent pigments work best for illuminated applications because they allow light to pass through while adding color. Opaque pigments block light transmission but can be used strategically for contrast or to create specific patterns within your design.
Metallic pigments create shimmer and depth, catching and reflecting the LED light in captivating ways. Gold, silver, copper, and bronze metallics add luxury to any design, while colored metallics like blue or green create unique effects.
Consider how colors interact with different LED light colors. White or cool-toned LEDs showcase blues and purples beautifully, while warm-toned LEDs enhance reds, oranges, and yellows. RGB LED systems give you the flexibility to change the color relationship dynamically.
Step by Step Installation Process for Illuminated Epoxy Staircase Indoor Projects
Creating an illuminated epoxy staircase indoor requires careful planning and methodical execution. Here’s a detailed overview of the process.
Planning and Preparation Phase
Begin by creating a detailed plan that includes measurements, design sketches, material calculations, and a realistic timeline. Research local building codes, as some jurisdictions have specific requirements for stair surfaces regarding slip resistance.
Order all materials well in advance, ensuring you have everything before starting. Epoxy projects cannot be paused mid-application, so having complete materials is essential.
Surface Preparation
Proper preparation determines the success of your project. Clean the surface thoroughly, removing all dirt, grease, and contaminants. Sand existing finishes to create a mechanical bond for the epoxy. Repair any cracks, chips, or imperfections in the substrate. Apply a primer coat if recommended by your epoxy manufacturer.
For illuminated epoxy staircase treads specifically, ensure each tread is perfectly level and smooth. Any unevenness will be magnified once the clear epoxy is applied.
LED Installation
Install your LED strips according to your design plan. Most installations place LEDs along the front edge of each tread or beneath the tread overhang. Run wiring carefully, securing all cables so they won’t shift during epoxy application. Test all LED connections thoroughly before proceeding with epoxy.
Consider installing the power supply and controller in an accessible location for future maintenance. While epoxy is permanent, LED systems may eventually need servicing.
Epoxy Application
Mix your epoxy components according to manufacturer instructions, paying careful attention to ratios and mixing times. Apply a seal coat first, which is a thin layer that seals the surface and prevents air bubbles. Allow the seal coat to cure to a tacky stage before applying your main pour.
For the main application, pour epoxy slowly and spread evenly using specialized tools. Work out any air bubbles using a heat gun or propane torch, moving quickly but carefully to avoid overheating. If creating layered effects or adding pigments, work in stages, allowing each layer to cure to the appropriate stage before adding the next.
Finishing and Curing
Once all epoxy is applied, protect the area from dust, insects, and temperature fluctuations during curing. Most epoxies reach handling strength within 24 to 48 hours but may take a full week to achieve complete hardness.
After full curing, you may choose to add a topcoat for additional protection, especially in high-traffic areas. Some installers apply anti-slip additives to the final coat to enhance safety.
Maintenance and Longevity of Your Illuminated Staircase

A properly installed illuminated epoxy staircase can last for decades with minimal maintenance. Regular care involves sweeping or vacuuming to remove dirt and debris that could scratch the surface, damp mopping with pH-neutral cleaners, and avoiding harsh chemicals or abrasive cleaning tools.
Inspect LED components periodically, checking connections and replacing any failed sections promptly. Modern LED systems typically last 50,000 hours or more, but individual diodes can occasionally fail.
If scratches do occur over time, minor imperfections can often be buffed out or filled with fresh epoxy. Major damage may require professional refinishing, but this is rare with proper care.
Cost Considerations and Return on Investment
The investment in an illuminated epoxy staircase varies widely based on staircase size, complexity of design, quality of materials, and whether you’re doing DIY installation or hiring professionals.
A basic DIY project using an illuminated epoxy staircase kit might cost between $1,000 and $3,000 for materials. Professional installations typically range from $5,000 to $15,000 or more, depending on the factors mentioned above.
While this represents a significant investment, the return comes in multiple forms. These installations dramatically increase home value, create a unique selling point if you decide to sell, provide functional and safety lighting, and offer decades of enjoyment with minimal maintenance.
Safety Considerations You Cannot Ignore
While aesthetics drive most illuminated staircase projects, safety must remain paramount. Ensure your epoxy finish includes appropriate slip resistance, especially if the surface might get wet. Consider adding texture to the topcoat or using anti-slip additives.
All electrical components must meet code requirements and be installed by qualified electricians if you’re not experienced with electrical work. Use low-voltage LED systems whenever possible to minimize electrical risks.
Ensure adequate lighting levels so the staircase isn’t just beautiful but also provides genuine visibility for safe navigation. While dramatic lighting is appealing, stairs need sufficient illumination to clearly show each step’s edge.
Bringing Your Vision to Luminous Life
An illuminated epoxy staircase represents the perfect fusion of form and function, transforming one of your home’s most utilitarian features into a captivating work of art. Whether you choose subtle elegance or bold statements, the glow effect created by epoxy and LED technology never fails to impress.
The journey from concept to completion requires careful planning, quality materials, and attention to detail, but the result is a one-of-a-kind feature that elevates your entire home. As you walk up and down your glowing stairs each day, you’ll experience the satisfaction of knowing you’ve created something truly special that showcases your personal style while providing practical benefits.
The combination of illuminated epoxy staircase treads, strategic lighting placement, and creative design choices allows you to craft an installation that’s uniquely yours. Whether you’re inspired by natural elements, modern minimalism, or bold artistic statements, epoxy resin provides the perfect medium to bring your vision to luminous reality.
With proper installation and care, your illuminated staircase will continue to shine bright for decades to come, serving as a daily reminder that even the most functional spaces in our homes can be transformed into extraordinary experiences. The initial investment in time, money, and effort pays dividends every time you see guests pause in wonder or family members smile as they navigate your glowing pathway.
Your staircase is no longer just a way to move between floors. It has become an illuminated journey, a conversation piece, and a testament to the remarkable possibilities that emerge when creativity meets craftsmanship.